
For many laptop users, optimizing graphics performance is becoming a necessity given the increasing visual demands of modern software. In 2026, when video games and graphics applications are becoming ever more resource-intensive, replacing the graphics card in your Asus laptop appears to be a viable but complex option. This guide aims to clarify the crucial steps, essential tools, and precautions to take to complete this hardware upgrade. We will explore the criteria to consider before disassembling and replacing the graphics card. Compatibility, performance, and user expectations will be addressed to provide you with a comprehensive and informed overview.
Why change the graphics card on an Asus laptop?
The graphics card plays a fundamental role in the optimal functioning of a laptop. It’s responsible for everything you see on the screen: from user interfaces and video rendering to high-definition games. Understanding its importance is crucial to grasping why a replacement might be necessary.
There are various reasons why a user might consider replacing their graphics card :
- Graphics performance: Over time, the demands of modern games and content creation software have increased significantly. If your machine is struggling to keep up, it might be time to upgrade to a more powerful graphics card.
- Obsolescence: Rapid technological advancements mean that an aging card may no longer be sufficient to run new applications and games.
- Energy consumption: Newer models are often more efficient. An update can mean better battery life.
Most Asus laptops have integrated graphics cards that can be soldered in, making replacement difficult or even impossible. However, some models, like the Asus ROG series, offer upgrade options via PCIe slots. This means that even though upgrade options vary from model to model, the appeal of this upgrade remains.
Understand compatibility before proceeding
Before attempting to disassemble your laptop, it’s essential to verify the compatibility between your new graphics card and your computer model. The wide variety of brands and models can be confusing, hence the importance of this step.
Here are the main methods for assessing compatibility:
- User manual: The technical specifications are often indicated there, which can guide you towards compatible models.
- User forums: Many online communities share their experiences, tips, and practical advice for completing this type of update.
- Specialized sites: Using resources like Tom’s Hardware can provide you with relevant information on graphics card choices suitable for your model.
For example, models like the Asus ROG Strix G are compatible with cards like the NVIDIA RTX 3060, while others like the Asus VivoBook 15 are not. This highlights the importance of carefully examining the technical specifications of each model.
| Laptop model | Graphics card type | Compatibility |
| Asus ROG Strix G | NVIDIA RTX 3060 | Compatible |
| Asus VivoBook 15 | AMD Radeon RX 550 | Not compatible |
| Asus ZenBook 14 | Intel Iris Xe Graphics | Compatible |
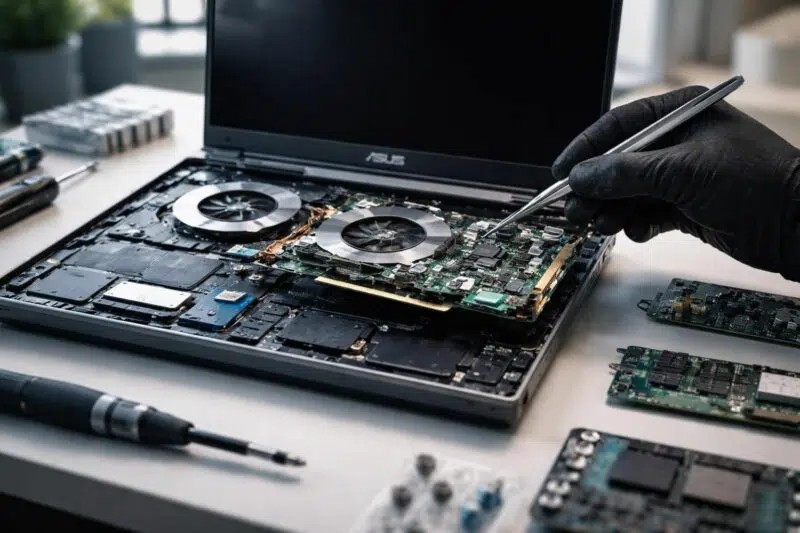
Disassembling an Asus laptop: key steps
To successfully disassemble a laptop, it’s crucial to proceed with care to avoid damaging internal components. Here’s a detailed guide to help you with this delicate task.
The disassembly steps include:
- Turn off the computer: Unplugging the device from any power source is a primary necessity.
- Remove the bottom panel: Use a screwdriver to unscrew the screws, then use a spatula to lift the panel.
- Disconnect the battery: To avoid short circuits, disconnecting the battery is crucial. A precise disassembly diagram, often provided in the manual, will facilitate this step.
- Accessing the graphics card: Locate and disconnect all cables associated with the card. A suitable screwdriver will allow you to remove it without difficulty.
Each model may have its own specific features. Exercising meticulous care throughout the disassembly process is essential for the safety of your components.
Installing the new graphics card
Once the old graphics card has been removed, installing the new one also requires following clear steps.
Here is the process in mind:
- Align the graphics card correctly: Make sure that the card connectors match those of the slot perfectly.
- Delicate insertion: Slowly snap the card into place until you feel it is properly positioned.
- Securing: Make sure to screw the card back in so that it is held securely in place.
- Reconnect the cables: Plugging in all the necessary connectors is essential, especially those that supply power.
If you follow these steps, your installation should be successful and without any problems.
Graphics card driver update
After installing the new graphics card, updating the drivers is a crucial step. It ensures that your card functions optimally and is ready to be fully utilized by your applications.
Here’s how to perform the update:
- Identify the graphics card: Use tools like GPU-Z to find out the installed model.
- Visit the manufacturer’s website: Whether for NVIDIA or AMD, go to the driver downloads section.
- Choose the right operating system: Make sure you download the driver version compatible with your system.
After installation, a restart is recommended for the changes to take effect. In some cases, a second restart may be required to finalize the driver update.
Testing the performance of the new graphics card
To ensure the update has been successful, it’s essential to test the performance of your new graphics card. This evaluation will allow you to measure the real impact on your user experience.
Several approaches can be used to perform relevant tests:
- Video games: Test several recent titles with different graphics settings to evaluate smoothness and display quality.
- Benchmarks: Use tools like 3DMark to obtain quantitative scores on the card’s power.
- Graphics applications: Use demanding software to evaluate the card’s responsiveness in high-load situations.
| Test type | Recommended tools | Results usually expected |
| Games | FPS, 1080p, 1440p | 60+ FPS in AAA titles |
| Graphic benchmark | 3DMark, FurMark | SCORES higher than those of the old map |
| Application tests | Adobe Premiere, Blender | Faster export, smooth rendering |
These tests will give you a precise indication of the improvement in graphics performance thanks to your new card.
Key points to remember for a successful upgrade
Upgrading the graphics card in your Asus laptop requires proper preparation and a certain level of technical expertise. Here are some key points to keep in mind:
- Always check the compatibility of the new card with your model before proceeding.
- Follow the disassembly and installation steps carefully to avoid damaging your device.
- Update the drivers after installation to get the most out of your new hardware.
- Carefully test the performance to assess the success of the upgrade.
Vigilance throughout the process will ensure a positive and optimized experience. Good luck with your graphics card replacement!